
- Stock: In Stock
- Model: T180.DHT11
DHT11 Digital Temperature & Humidity Sensor🌡️💧
The DHT11 is a cost-effective digital temperature and humidity sensor designed for straightforward integration with microcontrollers and development boards such as Arduino and Raspberry Pi. Its simple single-wire interface and low power draw make it ideal for educational, hobbyist, and basic monitoring projects in electronics.
ℹ️ General Information
The DHT11 measures both temperature and relative humidity and outputs the readings as a digital signal. It communicates over a single-wire protocol that is easy to parse on popular platforms (e.g., Arduino, Raspberry Pi, ESP8266/ESP32), making it a staple in DIY electronics components and modules collections.
⭐ Key Features
- Temperature range: 0 to 50°C (precision: ±2°C)
- Humidity range: 20% to 90% RH (precision: ±5% RH)
- Resolution: 1°C temperature, 1% RH humidity
- Power supply (voltage): 3V to 5.5V
- Low power consumption: suitable for battery-powered applications
- Digital output: single-wire communication protocol (DHT-specific)
- Response time: typically around 1 second
📌 Pin Configuration
The DHT11 package typically provides four pins, with three commonly used in most applications:
- VCC: Power input (3V to 5.5V)
- GND: Ground
- DATA: Digital data output (single-wire)
- NC: Not connected (optional)
🧰 Applications
- Weather stations: Ambient temperature and humidity tracking
- HVAC systems: Basic monitoring of heating, ventilation, and air conditioning
- Home automation: Environmental monitoring for smart projects
- Educational projects: Sensor interfacing with Arduino, Raspberry Pi, and other microcontrollers
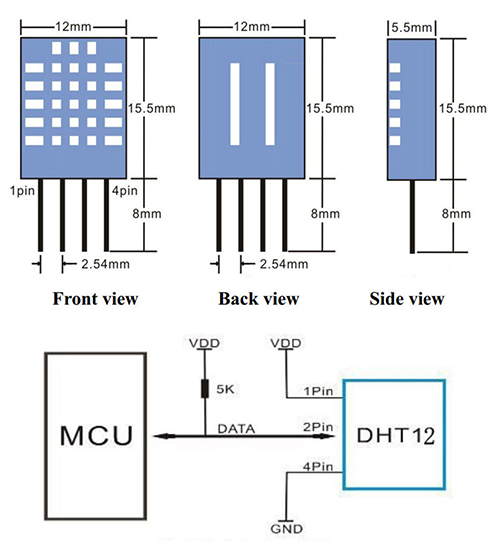
🔌 Wiring (Arduino Example)
Connect the DHT11 to an Arduino as follows:
- Connect VCC on the DHT11 to the Arduino 5V pin (3.3V–5V supported).
- Connect GND on the DHT11 to the Arduino GND.
- Connect DATA on the DHT11 to a digital I/O pin (e.g., D2).
- Add a pull-up resistor (typically 4.7kΩ to 10kΩ) between VCC and DATA.
💻 Example Code (Arduino)
Install the Adafruit DHT library via the Arduino IDE Library Manager, then upload the example below:
#include "DHT.h"// Define the type of sensor and the pin it's connected to #define DHTTYPE DHT11 // DHT 11 #define DHTPIN 2 // Digital pin 2DHT dht(DHTPIN, DHTTYPE);void setup() { Serial.begin(9600); Serial.println("DHT11 test!"); dht.begin(); }void loop() { // Wait a few seconds between measurements delay(2000); // Reading temperature and humidity values float humidity = dht.readHumidity(); float temperature = dht.readTemperature(); // Check if any reads failed and exit early (to try again) if (isnan(humidity) || isnan(temperature)) { Serial.println("Failed to read from DHT sensor!"); return; } // Print the results Serial.print("Humidity: "); Serial.print(humidity); Serial.print(" % "); Serial.print("Temperature: "); Serial.print(temperature); Serial.println(" *C"); }🔧 Calibration and Usage Tips
- Placement: Ensure good airflow around the sensor for more stable readings.
- Avoid heat sources: Keep away from direct sunlight, heaters, and enclosures that trap heat.
- Polling interval: Read no faster than about 1–2 seconds to avoid stale data.
- Verification: Periodically compare against a known reference if used in critical applications.
The DHT11 is a straightforward, budget-friendly choice for basic temperature and humidity measurements. While it offers lower accuracy and a narrower range compared to advanced sensors like the DHT22/AM2302, it remains a reliable option for learning, prototyping with Arduino or Raspberry Pi, and general-purpose electronics projects where simplicity and low voltage/power operation are priorities.